
________________________________________________________________________________________
STEP 1 = TURN ON COMMUNITY CHANNEL FEATURE IN PACKAGE SECURITY MANAGER IN CLOUD
STEP 1 = TURN ON COMMUNITY CHANNEL FEATURE IN PACKAGE SECURITY MANAGER IN CLOUD
3. Select the Edit Organization Settings Icon on the right side of the Org profile page. (see image below).
4. Toggle the Community Channel switch to ON to enable Community channel access for your
Organization.
Organization.
5. Read and agree to the Terms of Service for the Community Channel. This also lists out information
about the Community Channel.
6. Save your changes to the Edit Organization Settings.
STEP 2 = GET COMMUNITY CHANNEL URL FROM CLOUD
URL = https://repo.anaconda.cloud/repo/community
Screenshot of where it exists in Cloud → Channels section:
1. Sign into Anaconda.com
2. Navigate to your Anaconda Organization Channel Page.
3. From the Channel page navigate to the Community Packages tab.
URL = https://repo.anaconda.cloud/repo/community
Screenshot of where it exists in Cloud → Channels section:
1. Sign into Anaconda.com
2. Navigate to your Anaconda Organization Channel Page.
3. From the Channel page navigate to the Community Packages tab.
4. In the community packages tab, you can select the "Copy" button or "Copy to clipboard" button.
This will copy the community channel URL to your clipboard to paste later in your Mirror External
Source URL.
________________________________________________________________________________________
STEP 3 = REISSUE TOKEN FROM CLOUD. TOKEN IS NEEDED FOR COMMUNITY CHANNEL MIRROR.
1. Navigate to the Token Access Page, located on the left side of your Org Management.:
1. Navigate to the Token Access Page, located on the left side of your Org Management.:
2. click “Reissue token”:
3. Your Token will populate in a pop-up and you can then Copy Token credentials. These
credentials will be needed for the mirroring processes:
________________________________________________________________________________________
STEP 4 = GO TO Package Security Manager ON PREM and sign in
________________________________________________________________________________________
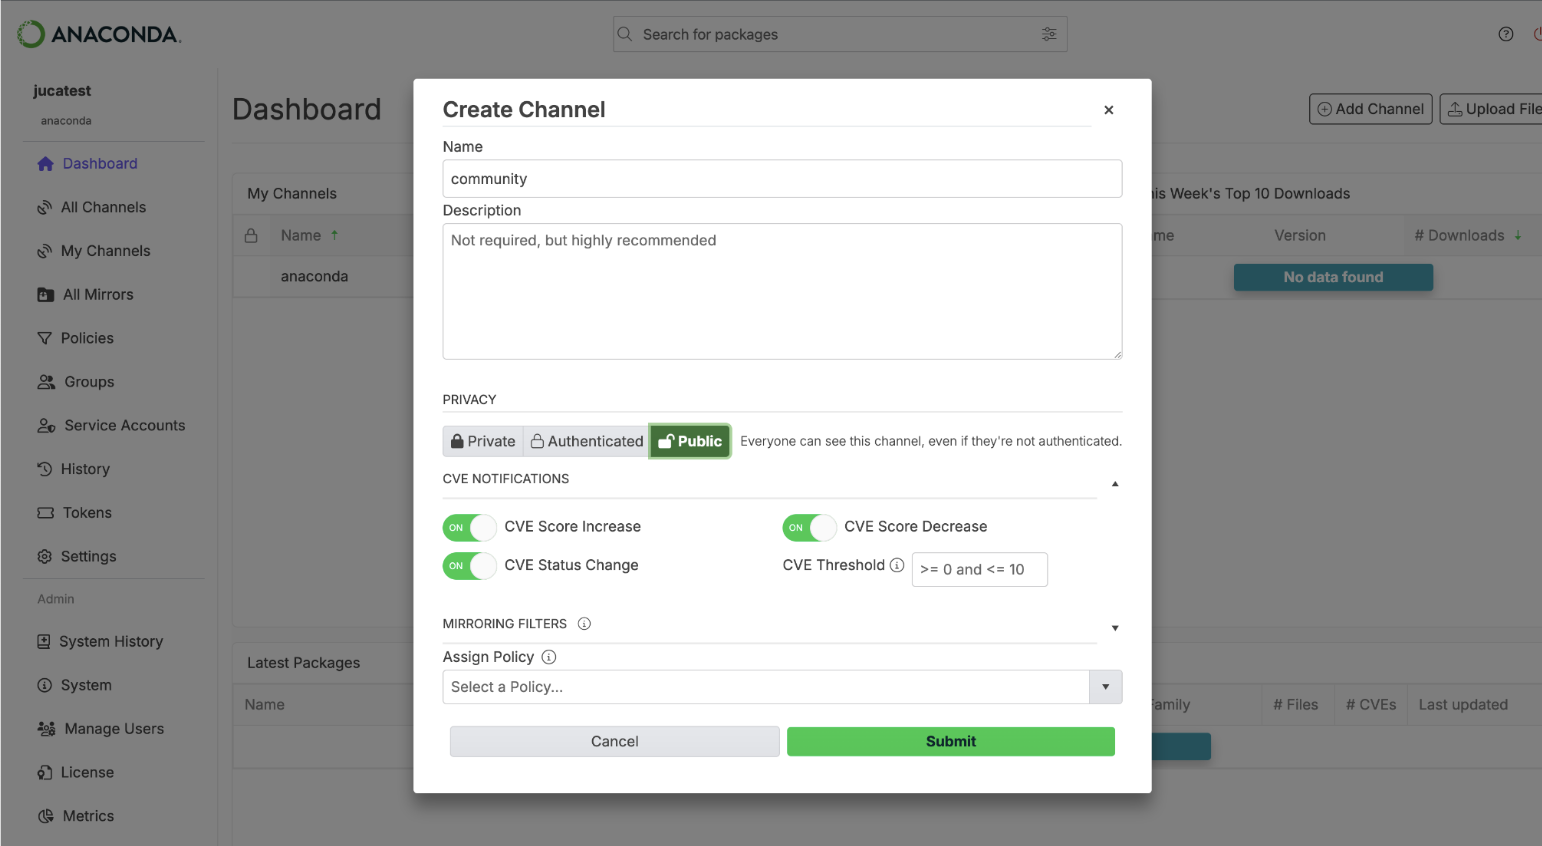
STEP 5 = CREATE A COMMUNITY CHANNEL
Click “Add Channel” button:
Then create the channel as you can see below with the green toggles & click Submit:
______ __________________________________________________________________________________
STEP 6 = GO TO MIRRORS → CREATE & ADD MIRROR
Select the channel you just created All Channels, in our example it will be community.
______
STEP 6 = GO TO MIRRORS → CREATE & ADD MIRROR
Select the channel you just created All Channels, in our example it will be community.
Select the Manage Icon button on the right side of your UI, this will provide you with a dropdown list. Select
Freeze Channel. For more information about why to freeze your channel for a mirror, documentation can be
Freeze Channel. For more information about why to freeze your channel for a mirror, documentation can be
found here: Freezing and Unfreezing Channels
Once the Channel is Frozen, we can then create our Mirror to Passively mirror the community channel.
Once the Channel is Frozen, we can then create our Mirror to Passively mirror the community channel.
To create a mirror, you are going to want to select the Manage Icon button again, and select “Create Mirror”. Alternatively, you can also select the mirror tab and select create a mirror. (see image below)
Create a Mirror:
- Mimic what you see in the screenshot below.
- Add a Mirror Name to your Preference.
- Insert the community channel in the External Source URL https://repo.anaconda.cloud/repo/t/<token>/community → Replace <token> with your Anaconda AI Platform Token ID.
- Make the Mirroring Mode Passive.
- Add any preferences or Policies to your Mirror.
- Click “Save & Run” in the bottom right corner.
- After saving, your mirror will start indexing the packages. This may take some time to finish as there are 16660 packages.
- Once the mirror has been completed, go back to your community channel, and unfreeze the mirror with the Manage Icon Button.
Step 7 Assigning Community Channel in Anaconda Navigator
- Open Anaconda Navigator.
- If you haven’t signed into Package Security Manager on Prem with Anaconda Navigator, you can do so by selecting the Connect button and this should drop down a sign in options (see image below). You will need your PSM on Prem Domain to set your configurations to your Domain.
- Then you are taken to a sign-in screen. You will need to sign in or sign in via SSO.
- You can then select in the channels accessible to you to set to your conda configuration, be sure to select community channel as one of the options.
- If you have already signed into PSM on prem in Anaconda Navigator. If the community channel is public then you should be able to see and access it if you select the channels button.
Alternative: Accessing Community channel via CLI
- Open your Anaconda Prompt or Terminal if you are on Linux/MacOS
- We first need to set our channel_alias towards our PSM on Prem to pull packages from.
- This can be done with the command: conda config --set channel_alias https://<FQDN>/api/repo
- Note: FQDN is your instance domain URL
- Then you can add the community channel with the command here:conda config --add channels <CHANNEL_NAME>
- Just make sure that the community channel name in PSM on Prem matches the channel name you are adding and is a public channel.
- This can be done with the command: conda config --set channel_alias https://<FQDN>/api/repo
If you already have your channel_alias set then you just need to add the community channel name that matches in your PSM on Prem to your conda configuration file (.condarc). This can be done with the same command as above: conda config --add channels <CHANNEL_NAME>